Monday, September 28, 2009

Getting Ready for Open Studio Day


I had been planning on giving a virtual tour of my creative space. When I discovered the theme of the Fall 2009 issue of Studios is Open Studios, and they are kicking it off with a virtual tour,I decided I had to participate! Stop back here on Saturday October 3rd and I'll have a tour of my studio for you.

I love what the great people at
Quilting Arts and Cloth, Paper, Scissors magazines share -- and I am really looking forward to seeing all the great studios shared through their inspiring Fall issue of Studios!

Thursday, September 17, 2009

Focusing on What Really Matters


I just completed a fiber art mixed media card I titled "Serenity." That word evokes a variety of feelings inside me. I am reminded of the "Serenity Prayer:"

"Lord, grant me the serenity
to accept the things I cannot change,
the courage to change the things I can,
and the wisdom to know the difference."

I am also reminded that there are such simple moments in each and every day I take for granted. Perhaps that's because I'm so caught up in trying to identify what I can and cannot change, that I don't often notice those!

The press of things to do in any given day often puts blinders on our eyes to what really matters. My thought for the day was one found in an 1883 book from my collection (Our Home):

"Joy is the natural and normal condition of every human soul.
To be genuine and permanent it must depend chiefly on internal
instead of external conditions. . .The difficulty is always on the part
of the eye and never on the part of the light."

Here's my personal challenge -- both to myself -- and to you:

"Look today with your eyes wide open, and see with your heart."

Tuesday, September 15, 2009

Hat Trimmings -- Feathers


For "Make a Hat Day" -- A hat is not complete unless you think about how you want to trim it. There are so many varieties of trims, from fancy bands, to flowers, to veils, to feathers. I will focus on feathers in this installment. If you go to a hobby store to find feathers for trimming your hat, chances are you will come away disappointed. They are usually packaged in cello and look much flatter than the feather trims you see on hats.

Here are some tips I discovered on how feather trims were made to look fuller on hats from the past (those terrific vintage finds):

Old feathers are thick and curled. How did they do that? The full-bodied plumes of yesteryear are actually often three plumes adhered together at the stems by milliner's glue to achieve the fullness desired.

The curve of a plume of feathers was achieved by attaching a piece of covered milliner's wire to the underpart of the lower stem with a very fine needle and matching thread. The wire was bent in the desired curve and the end of the plume was allowed to fall soft and free.

The curling of plumes was achieved by pulling the "flues" of the plume in small groups over a dull knife or scissors as though curling gift-wrap ribbon.

If a woman wearing a hat was caught in a sudden thunderstorm, she would end up with drooping plumes or feathers, but they could be easily re-curled to their former beauty.

Glorious Hats: Make a Hat Day

Glorious Hats: Make a Hat Day

Monday, September 14, 2009

Make a Hat


Wednesday, September 15th has been designated as "Make a Hat Day." As a theater costumer for a number of years, I made a lot of hats for a variety of productions. One of the best overall sources is Denise Dreher's book, From the Neck Up: An Illustrated Guide to Hatmaking. Although it is no longer being published, it is still available on Amazon, both some new copies as well as used.

In her book, Ms. Dreyer provides a glimpse into the history of hatmaking as well as a vast quantity of information on making a variety of different styles of hats through the centuries.


For my use in theater production, I especially appreciated her comments on design, which enabled me to create many different hats for the style of both the production and the wearer. Dreyer shares:

"In well designed hats the lines flow naturally into one another and lead the eye without any unexpected breaks or bends. Continuity must be maintained between all of the lines if the design is to be attractive. That is why soft, curvacious hats are usually trimmed with flowing ribbons and flowers while stiff, straight hats receive a more severe, tight hatband and flat bow.

"There are no pre-determined rules as to which lines best flatter which faces and figures. It is largely a matter of observation and experiment on the part of the designer. Through careful studies of people wearing hats, you will soon develop a good sense of this. Begin by trying several hats on yourself and note the changes."
There are a number of simple ways to make a hat if you don't want to start with a pattern. One I have used to good effect is to cover a straw hat with fabric and then add trims. The supplies you will need are:

* Designer fabric of your choice for covering the hat
* 1" wide grossgrain ribbon the measurement of the inside circumference of the crown plus 2" for overlap for making a sweat band (and for covering your raw edges of fabric from the brim cover)
* Fancy ribbon (minimum 1" wide) the measurement of the crown plus 2" for overlap for making the outer hat band (and for covering the raw edges of fabric where the brim and crown covers meet)
* Flowers, feathers and other trims to decorate the hat
* Glue (a heavy craft glue works best)

Step #1: To cover a hat, you must first take several crucial measurements:

* the diameter of the crown
* the circumference of the brim
* the depth of the brim (from where it joins the crown to the outer edge of the brim)

Step #2: To the diameter of the crown, add two inches. Then, create a circle based on that measurement. That will be your pattern for covering the crown.

Step #3: To the circumference of the brim, add one inch (for a seam allowance). That will be the length of the brim pattern. To determine the width of the brim pattern, double the depth of brim measurement you took and add two inches.

Step #4: Now, using the patterns you have made, cut one brim and one crown out of the designer fabric of your choice for covering the hat.

Step #5: One-half inch in from the edge of the crown you have cut from fabric, run a loose stitch (preferably by sewing machine) all the way around for gathering. Place the fabric crown over the crown of the hat and gather up the stitches until the crown fits smoothly. Carefully lift the edge and apply glue. Press the fabric against the straw hat crown.
Step #6: Take the brim fabric you have cut to the pattern and join the two short ends together, right sides together, sewing in a 1/2" seam. Press the seam allowance open. Then, fold the width of the fabric, wrong sides together and press all along the fold. Open back up and run a loose gathering stitch along BOTH long edges of the brim fabric (be sure you are sewing each edge separately).

Step #7: Place the brim fabric over the brim, one edge under the brim and the other edge on top of the brim (with the fold at the outermost edge of the brim). Pull the gathers up on each side, encasing the brim as you do so. Make sure the inside edge of the brim tucks just up into the crown on the inside and glue those gathers in place. The outer gathers can be covered more effectively with the fancy hatband should there be an slight gap. Glue the outer brim edge next to the crown.

Step #8: Now, using the grossgrain ribbon, cover the raw edges and gathers of the brim fabric, creating a sweatband. Fold the last bit of the ribbon before you glue it down so there are no raw edges of the ribbon.
Step #9: Using your fancy hat band ribbon, cover the gathers and raw edges on the outside of the had where the crown and brim fabrics join. Fold the last bit of the ribbon before you glue it down so there are no raw edges of the ribbon. I leave the top edge of the ribbon band open to help hide any trims or feathers I might add, gluing that down as I go.

Step #10: Trim your hat with flowers, lace, or feathers -- or all of the above! Hot glue can be effective at this point, especially if you want the placement to be "just so."

If you cannot find a suitable hat to cover, it is easy to make a hat from scratch. There are patterns available for different styles. The hat pattern I have available in my Etsy store is very versatile. Even though it is shown with a Victorian style (perhaps appealing to the Steampunk culture or Halloween costuming), different trims would give it a more modern appeal.


Hat Pattern:

Saturday, September 12, 2009

So, you know I'm deep in cyberspace when. . .


I've gotten so far into social networking (facebook, twitter, blogs, etc.) that I actually stumbled upon a website handing out your "fairy name" randomly (based on your real name, supposedly). Now, I am an incredibly imaginative person (had an imaginary playmate as a girl -- she was really great for blaming my mishaps on!). So, I just had to try this out. Those who know me well -- does this little fairy sound like me?

Your fairy is called Tangle Saturnfilter
She is a trouble maker.
She lives at the bottom of tangled gardens and in hedgerows.
She is only seen on midsummer's eve.
She wears tangled dresses of multicoloured petals. She has delicate pale pink wings like a cicada.

Friday, September 11, 2009

Learning the Value of Tweeting on Twitter

I have been working all day long (in between tasks) to learn how to tweet on twitter. After experiencing an onslaught of possible followers that scared the daylights out of me, I think I have begun to both narrow down my choices and then enhance those to make the most out of this experience.

One of the most valuable tweeters I found to follow as an artist is nikolena (Nicolette Tallmadge). She has some tweets on several "blog radio" sessions she has done on "7 Things You Can Do Today To Get More Traffic To Your Art Website." I listened to just one installment and came away with loads of information -- just in time for the Christmas season.

I just don't want to end up like the TV commercial where the teenagers are totally embarrassed by the dad and mom who are tweeting in their presence about totally nonsensical stuff. If you do want to start getting my tweets (which I promise will be fun quotes and artistic tips -- not what I had for lunch), my twitter name is VintageLegacy. I've put a link showing my tweets today in the left-hand bar of the blog.

Wednesday, September 9, 2009

1,000 Ways of Getting Rich -- From the Experts of 1890


I just listed a terrific antique book published in 1890 for sale in my Etsy shop. It is actually two books in one: The Compendium of Cookery and Reliable Recipes and The Book of Knowledge, or 1,000 Ways of Getting Rich.

The treasured recipes and tips within these two books will have you howling, both with delight and incredulity. Of course, 119 years ago, this volume was published in all seriousness. And . . . many of the tips are very user-friendly for us today. Great-great-grandmother would be considered to be very green in how she followed the old addage, "use it up, wear it out, make it do, or do without" in following the advise within its pages.


Here are some of the more humorous selections:

"To Sweeten Meat: A little charcoal thrown into the pot will sweeten meat that is a little old. Not if is in anyway tainted -- then it is then not fit to eat -- but only if kept a little longer than makes it quite fresh."

"Moths in Carpets: Persons troubled with carpet moths may get rid of them by scrubbing the floor with strong hot salt and water before laying the carpet, and sprinkling the carpet with salt once a week before sweeping."

"A Good Wash for Hair: One pennyworth of borax, half a pint of olive-oil, one pint of boiling water. Mode: Pour the boiling water over the borax and oil; let it cool; then put the mixture into a bottle. Shake it before using, and apply it with a flannel. Camphor and borax, dissolved in boiling water and left to cool, make a very good wash for the hair; as also does rosemary water mixed with a little borax. After using any of these washes, when the hair becomes thoroughly dry, a little pomatum or oil should be rubbed in, to make it smooth and glossy."


On the practical side, there are some wonderful recipes -- for everything from making wine and simple sauces to making candy and taffy. The selections on canning and preserving make this book worth its weight in gold! The Book of Knowledge section gives hints and tips on everything from making your own ink, to a cement you can make to mend broken china. Here's a tip for removing indelible ink stains (very green indeed):

"Soak the stained spot in strong salt water, then wash it with ammonia. Salt changes the nitrate of silver into chloride of silver, and ammonia dissolves the chloride."

Monday, September 7, 2009

Learning to Take Better Pictures


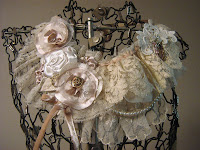
One of the criteria for taking good pictures, I'm struggling to learn, is using the manual settings on your digital camera. That, and choosing the best background and overall lighting. I have been working on taking pictures of one of my new creations for my shop on Etsy, and I'm having more trouble than I thought I would. I would like your help, please. Here are some pictures, the one above taken in a lighter room using my setting for tungsten light -- without a flash.


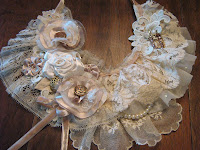
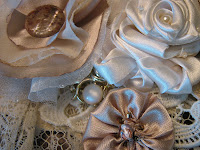
The second one is in a different room with overhead lighting and a wood table. I still used the setting for tungsten lighting, no flash. Any suggestions? Here's a close-up shot -- again, same settings.

Friday, September 4, 2009

Sunflower Splendor


The hail we got in our area this summer pretty well obliterated our tomatoes and vegetable garden, but the sunflowers have been amazing. I've never seen such a glorious array! It has been fun to use them in staging photos of my vintage items and artwork for sale in my Etsy shop.

I have also used them in simple bouquets for my desk. They always make me smile. I know it is bound to turn cold and they will bow their heads, giving up the last of the summer sun very soon. That's why I decided to write an ode to their cheery faces today.

LinkWithin

Related Posts with Thumbnails